Client certificates are a cool technology that, once setup, eliminate the need to use your password on your own website from your own devices.
This article wont run through the entire procedure for setting up a web server, Windows domain, file permissions, server certificates, or a certificate authority. I just want to convey some of the configuration pitfalls that exist in IIS 6.
Step 1: Enable Client Certificate Mapping
- In the IIS Manager, go to the properties of the Default Web Site (or other name).
- Click on the Directory Security tab.
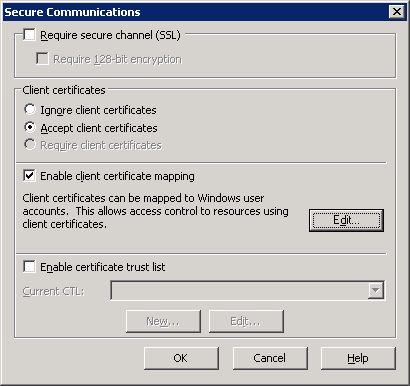
- In the “Secure communications” section all the way at the bottom, click the Edit button. If the Edit button isn’t enabled, you need to install a server certificate first.
- In the Secure Communications dialog box, select either “Accept client certificates” or “Require client certificates”.
- Select “Enable client certificate mapping.”
- If you want to use “1-to-1” static mapping then click the Edit button to complete your configuration. Otherwise…
- Click OK and proceed to Step 2.
Step 2: Really Enable Client Certificate Mapping
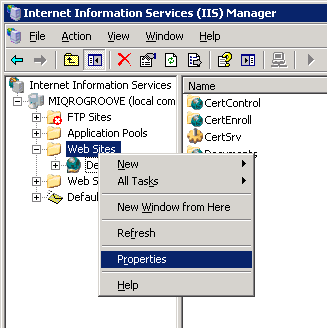
- In the IIS Manager, go to the properties of the Web Sites folder. Important: This is not the same as site properties.
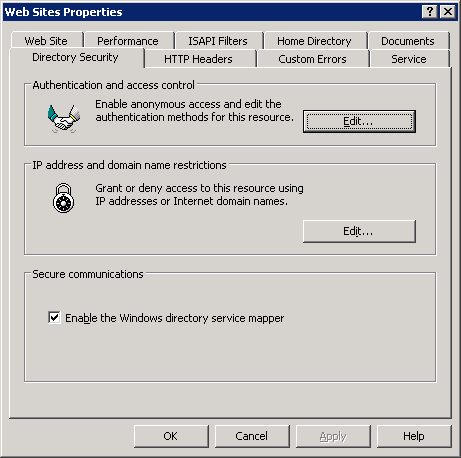
- Click on the Directory Security tab.
- In the “Secure communications” section all the way at the bottom, there is now one magical option available to you called “Enable the Windows directory service mapper.” Turn that on to enable the DS client mapping mode.
- Click OK.
Step 3: Generate Certificates
As mentioned earlier, you need to have the Certification Authority (CA) fully up and running in your server.
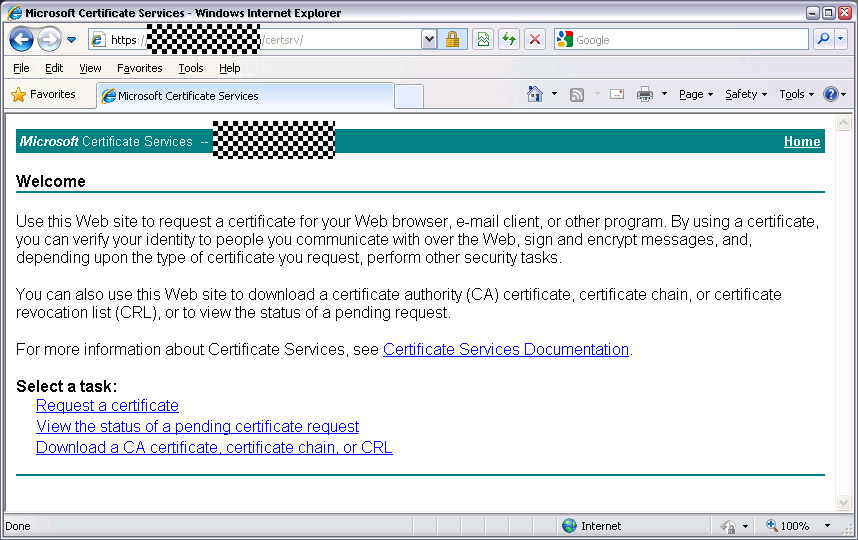
- Log in to your user account on Windows XP and open Internet Explorer. This will not work in Chrome.
- Navigate to the web enrollment address http://server/CertSrv/
- Important: the Windows 2003 web enrollment software is not compatible with Windows 7 or Windows 8. You must use a Windows XP computer for this step.
- Click the “Request a certificate” link.
- Click the “User Certificate” link.
- Click the “Submit >” button.
- You should be prompted at least twice: First to confirm that you want to generate a certificate request, and then to confirm installing the new certificate.
- You should now be able to log in to your encrypted website using Internet Explorer or Chrome without a password.
Step 4: Install Certificates on Other Devices

- Click Tools > Internet Options, or find the Internet Options control panel.
- Click the Content tab.
- Click the Certificates button.
- Highlight the certificate that was issued by your CA to your user.
- Click the Export button.
- Click Next.
- Select “Yes, export the private key”. Note: The private key is the part of this whole system that does not leave your possession. Never copy or import your private key file to a public computer.
- Complete the Certificate Export Wizard to create a PFX file.
- This PFX file can be imported into Firefox, iOS, etc.
- When importing the PFX into other Windows computers, be sure to mark the private key as exportable so that you can transfer the certificate to devices (e.g. BlackBerry) that require retrieval from the certificate store on that computer.
- You should now be able to log in to your HTTPS website using Firefox, Safari, BlackBerry, etc. without a Windows username and password.