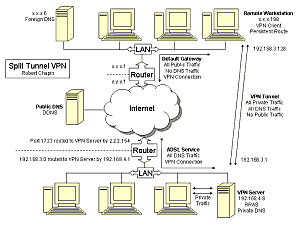
Anyone who has attempted a Virtual Private Network (VPN) connection in Windows XP has run into this problem: You want to have access to computers at your home or office, but Windows accomplishes this by routing all of your activity to the home network. If your work involves transferring files to a server and surfing the Internet, then your Internet activity has to piggyback on the VPN and travel twice within your limited home bandwidth. This means your slow VPN is even slower when you load a website, and any interruption of the VPN will break all of your connections to FTP sites, IM services, etc.
You may have tried to coerce Windows into routing your traffic to two different gateways, but quickly realized it wasn’t designed to do that. Adding entries to the local routing table can solve the problem temporarily, but doing so requires administrative privileges and ugly dynamic logic to handle a gateway address that changes every time you connect the VPN.
My solution for this scenario comes in two parts: 1. A static address for the VPN client computer, and 2. A persistent route for the VPN client’s static address. This is a bit easier said than done, so the following tutorial includes screenshots and details.
Client Configuration

To get started on a split tunnel system, you will need a Windows XP VPN connection that is already working. In this example, I will assume that the network addresses are as follows:
- Private network segment: 192.168.4.0/24
- VPN segment: 192.168.3.0/24
- VPN server: 192.168.4.8
- Private DNS server: 192.168.4.8
- Private network router: 192.168.4.1
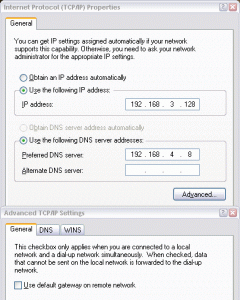
If your addresses are different, or if your VPN server is located on the network router, then you will need to make the appropriate adjustments to the screen shots. For the sake of separating static addresses from dynamic addresses, I have chosen to reserve the upper half of the VPN address range for static addressing. My first static client is numbered 192.168.3.128. That address gets typed into the TCP/IP networking properties of the VPN connection, along with the address of the private DNS server.
To begin splitting up private from public traffic, the default configuration needs to be changed by clicking the Advanced button. In the Advanced TCP/IP Settings window, disable the option named “Use default gateway on remote network”. You should also specify the address of your private WINS server where appropriate.

After saving the new TCP/IP settings, you will likely need to correct a bug in the Windows XP registry. For whatever reason, the network binding order specified in the Network Connections Advanced Settings menu doesn’t work properly. The way to fix it is to change the order of the devices listed in HKLM\SYSTEM\CurrentControlSet\Services\Tcpip\Linkage\Bind. The line at the top of the value must say “\Device\NdisWanIp”, and it must be moved if it shows up in any other order. This step should be completed carefully by following the Microsoft knowledge base article, Cannot Change the Binding Order for Remote Access Connections. If you skip this step, you might notice that all of your DNS queries are sent to the wrong server. It is important to use your private DNS server so that your client computer can resolve private addresses.

The next step should be relatively easy, so I will simply explain what to do. You need to add a “persistent route” on your client computer, for your home network, pointing to the static client address. Here is how I did that:
- Connect to the VPN.
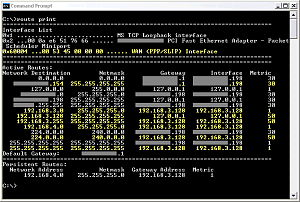
- Use “route print” in a Command Prompt window to find the WAN Interface hex number. Example: 0x60004
- Use “route -p add” to create a persistent route to the home network. Example: route -p add 192.168.4.0 MASK 255.255.255.0 192.168.3.128 METRIC 1 IF 0x60004
After you finish that step, the next time you connect the VPN, you should get a split tunnel routing table like mine automatically. I have highlighted in yellow all of the table entries that are created automatically when the VPN is connected. The first highlighted line shows the route for the VPN connection itself. The next three highlighted lines are the VPN segment routing. Next, you can see that Windows has automatically added a route to the home network, 192.168.4.0, using the static address of 192.168.3.128 as the gateway.
Server Configuration
If the steps above seemed a little too easy, it’s because half of the magic happens in the home network and not in the client itself.
First, the Routing and Remote Access Service (RRAS) must be configured with the lower half of the VPN address range for dynamic addressing. In this example, I used 192.168.3.1 – 192.168.3.126. Next, you need to make sure that your user account is allowed to connect remotely, and is allowed to use a static address. The default policy settings will require that the VPN client use an address provided by the VPN server instead of a static address, so be sure to use the “Client may request an IP address” setting.
The last two steps are equally important. Because the VPN server has a private address, the private network router must be configured to route incoming public VPN traffic to the VPN server.


Finally, the reciprocal of the client’s “persistent route” must be considered. If the client attempts to communicate with any computer on the private network other than the VPN server, that other computer will recognize the connection’s return address, 192.168.3.128, is not a local computer, and promptly send a response to its default gateway, 192.168.4.1. That is indeed the correct place to send such information, but the router doesn’t have any physical segment in that address range. The router has to be configured to send private VPN traffic to the VPN server.
Obviously, there is more than one possible approach to this solution. The VPN server can be configured to assign static addresses to each user, but I felt it was more appropriate to assign them to each computer. There are also 3rd-party solutions and better hardware that could accomplish all of this. But if you love Windows XP VPN connections for what they’re worth, you should love the idea of splitting public and private connections over the Internet.
Update: For some new ideas, check out my follow-up article, Split Tunnel VPN Part 2.


I want to have secure split tunnel network traffic inside windows first ! Why ? If we use virtual desktop accounts and so on …(level 0 virtualization tech we do not have network virtualized but shared and each desktop is isolated from each other ! How to tunel/secure/split each network trafic from app that runs on diferent desktops but is the same one/accounts thru each own virtual ip/tunel/proxy ! I’d need some sort of software proxy/router/gateway for that purpose !
Some professional info/pointer is welcome !
Hi Steve, to isolate traffic between systems on the same physical computer, you would need to use virtual switching. That is a separate concept from Virtual Private Networking. Windows 2008 does include such network virtualization technologies. In Microsoft jargon, you can create a virtual network switch that will isolate traffic between each virtual machine’s unique IP address. Instead of using IP tunnels, packets are switched to the physical adapter as though it were an uplink between physical Ethernet switches. Packets are then sent to the virtual machines by the virtualization server.
I hope that helps explain the difference between VPN and virtual switching.
Thanks for the pointer but i will probably buy some powerful home supercomputer with some 16 to 32 GB RAM and 2 CPU with 6 cores and some nvidia cuda in pci express for paralell processing before i solve this problem ! All point to that that is far more easy to virtualize whole os as virtualize and manage parts of it ! I wouldnt need virtualization if there were no internet threats so is security precasions manage virtualized os as data folder easy to deploy and portability of os to run on different hardware and easy backup in case of crash and trouble as native installed ms os does not have ! Parralel processing for testing purposes and to run some Ansys PTC and CAD’s ! All that in one box all virtualized and all secure !!! Again thanks ! I have found out that super network tunnel will do the job thus was not developed to be used this way ! I only needed to tunnel traffic due app will not be aware of multiple instance on network level inside win runned in diferent accounts ! Again thanks !
Hi Robert,
Your post is the closest thing I’ve found to instructions for truly configuring how to route protocols on a local computer to prevent all traffic from being sent through a VPN!
However, I’m already stuck at where you mention that the 1st reg entry should be NDIS\WanIP – Windows 7 doesn’t have that entry, from the looks of it.
Perhaps this detailed guide is no longer needed in Windows 7? Do you have any advice for _any_ method of making it so that only the HTTP, HTTPS, and SMB are sent through my PPTP VPN, and all other programs and protocols are just put through my local gateway!
Thanks for any advice you can provide! There’s not very many websites out there that deal with this on the advanced level that you do; they just talk about splitting Internet traffic off from VPN traffic with the unchecking of the “use default gateway on remote network” box.
Hi Zach,
The registry hack was specific to Windows XP. Assuming the binding order bug is fixed in Windows 7, all you would need to do is adjust the binding order from advanced network settings to ensure you are using the private DNS instead of the local DNS. Check out this page for instructions http://bit.ly/zlNgO1
As for separating protocols, that is a bit of a thorny issue. HTTP and HTTPS are both application layer protocols. The only way to re-route them at the network layer would be by port number. That would be a very unusual requirement. Typically, when web requests need to be routed through a particular server then an HTTP proxy is installed.
SMB should not need any special routing. As long as you are using your private DNS, your private servers should always resolve to private IP addresses.
Thanks so much for your work on this- it has been a mind bender to try and get what seems like a simple routing issue figured out.
I have a little different scenario that I am trying to do this with- User is connecting from home network using Win 7 and PPTP VPN to Server 2008 RRAS/PDC (joyously located on 192.168.1.x/24)this system worked for users without split tunnel until we added a phone system on the 172.16.1.x/24 network.
Here’s the pickle- If the user is VPN connected normally(DG on remote network) then softphone connects fine, as ping can reach 172.16.1.x subnet. However, when split tunneling is configured(which speeds up youtube for said user) then the user machine CAN reach 192.168.1.x(remote) network, but is NOT able to see 172.16.1.x subnet and therefore softphone no workie.
I have tried to add a static route on the user machine to no avail(bad arguement), tried setting a static route via AD for the user under the Dial-in tab, and generally hated myself.
My question is this- how do I get the user to be able to hop subnets on the VPN while also split tunneling, ideally pushed from server side? It seems like there ought to be some kind of Dynamic routing solution, but static routing would be fine as well. Thanks!
Hi Jeremy,
Be sure to check out my new article at http://miqrogroove.com?p=718 because that same solution would solve your remote telephony routing issue. By renumbering the VPN to 172.16.2.0/24 you force the Windows VPN client to use 172.16.0.0/16 as the VPN route. So if you also renumber your server (LAN) segment to 172.16.3.0/24 then you will have remote access to all three subnets through the tunnel.
That article also mentions how to publish static routes using CMAK. I haven’t tried doing that with CMAK myself, so let me know if you end up going with that option.
The static routes you mentioned in the AD user profile are actually server routes, not client routes.
On the user machine, be aware of the difference between a static route and a persistent route. Static routes are not saved and will disappear periodically.
I hope these extra tips will help!
Robert,
Thanks for the tips- I am going to give CMAK a whirl as redisigning our subnets is really not an option at this junction(would like to change that later though)
I will keep you posted.