Back in August, I mentioned the importance of disabling most versions of PPTP for security reasons, and included my own tutorial for How to Secure a Windows VPN with PEAP. That solution works great for Windows, but is not compatible with iPads.
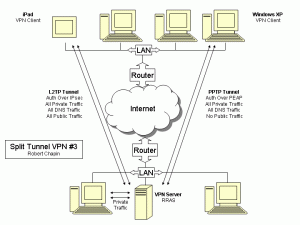
Now I will offer a solution that works great for iPad, but may not work on Windows computers. In addition, I will explain how to get the two solutions to work together securely so that both Windows and iPad computers will be able to connect to a Windows VPN simultaneously without using the insecure versions of PPTP.
The Layer 2 Tunneling Protocol (L2TP) is an obvious choice for the iPad because it is the only supported protocol other than the insecure PPTP option. On the server side, however, there are some implementation nuances that could easily discourage the use of L2TP. I took the time to research L2TP in more depth before writing this article, because I felt that a generic recommendation could leave readers totally confused about the security issues involved. So before delving into a new tutorial, I want to explain two new concepts: L2TP Pre-Shared Key, and L2TP NAT Traversal.
NAT Traversal could be a major concern for any L2TP implementation, because Microsoft wrote a very technical and rather intimidating knowledge base article called IPSec NAT-T is not recommended for Windows Server 2003 computers that are behind network address translators. If you’ve seen that article, I want to assure you that the Microsoft recommendation is not relevant here.
A careful reading of the Microsoft recommendation against NAT-T will reveal that the underlying security problem with NAT-T is not a server problem but a client problem. In other words, Microsoft recommends that Windows XP computers not attempt to use NAT-T to connect to privately-addressed servers. The Windows 2003 server itself fully supports NAT-T out of the box and doesn’t even need to be configured to use it. This is perfect for iPad users, because iPad also supports NAT-T out of the box, and this almost eliminates the address translation challenges of using L2TP.
Pre-Shared Keys are a requirement of the iPad L2TP client. A pre-shared key has the implication of making the VPN only as secure as the key. It’s like a password, but it’s used to encrypt communications. Choosing a key that is, let’s say, more than 32 characters in length, and never giving that key to anyone, will create a VPN far more secure than by using PPTP with MS-CHAPv2. When it becomes necessary to distribute the key to several VPN end users, then there is an implicit trust among those users, and an added risk of the key being lost or stolen. Consequently, the iPad L2TP client is a horrible solution for enterprise security, but arguably much more secure than using the iPad PPTP client. Also note that even though L2TP still uses the insecure MS-CHAPv2 protocol, it encapsulates that authentication with IPsec encryption to make it secure, whereas the iPad PPTP client transmits MS-CHAPv2 in the clear.
Step 1 – Enable a Pre-Shared Key
The first step in securing the iPad VPN connection is to generate or select a randomized key. This tutorial assumes you already have a working Windows 2003 VPN server and only need to configure the additional L2TP options.
I had some trouble testing shared keys that contained symbols. Since I haven’t determined the exact limitations of the Windows and iPad key inputs, I will make these recommendations:
- Use upper and lower case letters.
- Use numbers.
- Use more than 32 characters.
- Use less than 255 characters.
Write down or save the key somewhere so that it can be entered both on the Windows server and on the iPad client.
Next, open the Routing and Remote Access console.
Display the properties of the VPN server by right-clicking the server name in the console, and clicking Properties.
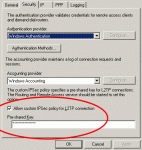
Click on the Security tab of the server’s Properties dialog box.

At the bottom of the Security tab, the box needs to be checked for “Allow custom IPSec policy for L2TP connection”.
Type or paste your new key into the Pre-shared Key text box.
Click OK.
Step 2 – Add L2TP Ports
Left-click the Ports item in RRAS. If there are no L2TP ports already listed, then you need to add them.
Right-click the Ports item and click on Properties.
WAN Miniport (L2TP) should be selected.
Click the Configure button.

Make sure the number of “Maximum ports” is greater than zero, and that inbound connections are enabled.
Click OK.
If the Used By column says None instead of RAS, then you have not enabled L2TP or inbound connections. Try again. Restart RRAS and verify above steps if necessary.
Click OK.
All of the L2TP ports should now be listed in the RRAS console. If not, then you have not enabled L2TP or inbound connections.
Step 3 – Configure the Firewall
If your VPN server is located on a perimeter network and has a public IP address, then the only remaining step on the server side is to ensure there are no firewall rules blocking public L2TP traffic. Remember to check Windows firewall settings as well as any hardware firewall settings.
Or
If your VPN server is located on a private network (e.g. my split tunneling articles illustrate servers with private addresses) then you must ensure public IPsec traffic is forwarded to the VPN server. This involves three components:
- Windows Server – IPsec NAT-T is supported and enabled by default.
- iPad client – IPsec NAT-T is supported and enabled by default.
- Router NAT – Must be configured as follows:
- IKE – Public UDP port 500 forwarded to VPN server port 500.
- IPsec NAT-T – Public UDP port 4500 forwarded to VPN server port 4500.
Step 4 – Configure the Client
On the iPad, go to the system Settings.
Tap “General”.
Tap “VPN”.
Tap “Add VPN Configuration…”

L2TP is selected by default. You need to fill the following fields:
- Description – Anything you want, e.g. “My Secure L2TP Network”
- Server – The public IP Address or DNS name of your server.
- Account – The Windows username that you use to log in.
- Password – The password that you use on the Windows domain for this account.
- Secret – Type or paste your new key here exactly as you did on the server.
RSA SecurID should remain OFF, Send All Traffic should remain ON, and Proxy should remain Off.
Note that if you get an error message saying the connection was refused, this can also mean the iPad’s pre-shared key was rejected. It won’t tell you that specifically. If in doubt, use a very simple key for testing purposes until you’re certain the server is working.
Step 5 – L2TP PSK and PPTP PEAP on the Same Server
Getting L2TP and PPTP to work together securely is just a matter of having at least two access policies configured with different settings. If you were using a single Remote Access Policy before, that will be inadequate now.
In RRAS, right-click on Remote Access Policies, and then click New Remote Access Policy.
Instead of using the policy wizard, select “Set up a custom policy.”
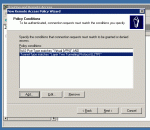
The next screen is called “Policy Conditions”. A simple VPN access policy includes the NAS-Port-Type and the Windows-Groups conditions. For this policy, you must also add the Tunnel-Type condition.
Add the Tunnel-Type named “Layer Two Tunneling Protocol (L2TP)”.

On the next screen, select “Grant remote access permission.”
On the next screen, click the Edit Profile button.
On the Authentication tab, select only MS-CHAP v2. On the Encryption tab, select only “Strongest encryption (MPPE 128 bit)”.
You should now have at least two Remote Access Policies.
Double-click the old policy.
If the list of policy conditions does not include Tunnel-Type, add it now and specify “Point-to-Point Tunneling Protocol (PPTP)”.
Click the Edit Profile button.
On the Authentication tab, make sure none of the boxes are selected. All of these methods are currently considered insecure for use with PPTP. You can verify with the EAP Methods button that your PEAP configuration is still intact.
Click OK.
When finished, you should have one policy that specifies MS-CHAP v2 authentication for L2TP tunnels, and one policy that specifies PEAP authentication for PPTP tunnels. With this configuration, all other (less secure) remote access connection types will be rejected.
A Final Warning About iPad Security
iPads lack the capability to automatically connect or re-connect a VPN. There is also no warning when the VPN is dropped. This makes any iPad VPN a poor substitute for proper wireless encryption. Be very cautious about using any iPad at a public wireless hot spot.