In light of last month’s announcement by Moxie Marlinspike and David Hulton that they developed a method for decrypting Windows VPN traffic in under 24 hours, it is now important to stop using MS-CHAPv2 as a means of authenticating VPN passwords.
There is a relatively simple fix for this. Microsoft VPN servers have the ability to authenticate passwords using another protocol called PEAP, also known as PEAP-EAP-MSCHAPv2. The only reason one might avoid using PEAP in the first place is that the Microsoft documentation is confusing and describes a requirement for Public Key Infrastructure (PKI) deployment. The PKI as described in Deploying Remote Access VPNs requires anywhere from one to three servers just to issue certificates. However, it only specifies the PKI requirement for a slightly different protocol called EAP-TLS.
To be clear, PEAP does not require a full-blown PKI or even an internal Certificate Authority. You can, in fact, use the same certificate that has been, or would be, issued to a web server for SSL encryption. There is no reason to add a second certificate just for a VPN server. This also means there is no investment required in PKI if a free certificate issuer is used, such as startssl.com.
Below is a brief tutorial for configuring an existing RRAS installation with PEAP-MS-CHAPv2.
Step 1 – Enable EAP
New Server
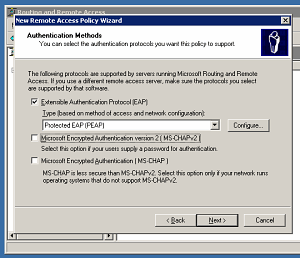
If you are setting up a new VPN server, an important step is adding the first Remote Access Policy to allow incoming connections. During this procedure, one of the wizard pages is titled Authentication Methods, and it has only MS-CHAPv2 enabled by default.
Turn on the EAP option and make sure PEAP is the selected Type. Turn off MS-CHAPv2 if you have no need for multiple protocols.
Click the Configure button to reach the Protected EAP Properties dialog box.
Existing Server
The same thing can be done to an existing policy with just a few more clicks.
Double-click on the applicable Remote Access Policy to view its properties.
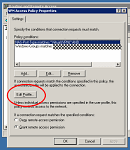
Click the Edit Profile button.
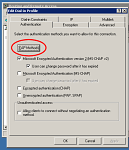
Click the Authentication tab in the Edit Dial-in Profile dialog box.
Click the EAP Methods button.


Click the Add button and select PEAP from the list of authentication methods.

Click the Edit button to reach the Protected EAP Properties dialog box.
Protip, suggested by Matze in the comments: It is possible to disable EAP at the RRAS server level, which could cause a client authentication error or similar problems with Remote Access Policies. Make sure EAP is enabled both for the server and for the appropriate policy.
Step 2 – Verify the PEAP Settings
At this point, you should be done with the server configuration!
When the Protected EAP Properties dialog box opens, it should automatically select the first available server authentication certificate. This might be a certificate that was previously installed on the server (e.g. through IIS), or a certificate that was automatically requested from an internal Certificate Authority.
Also selected automatically should be the EAP Type described as “Secured password (EAP-MSCHAP v2)”.
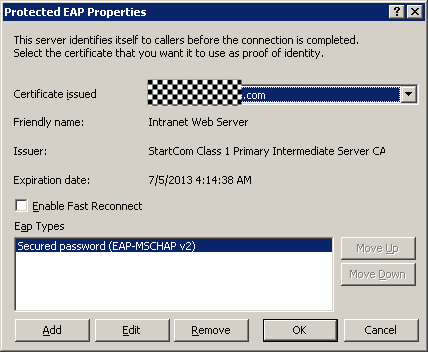
Simply click the OK button after verifying the information above.
Step 3 – Configuring Clients
The other half of the PEAP setup involves a change to the Windows VPN client. By default, the New Connection Wizard only enables MS-CHAP and MS-CHAPv2. This will no longer work if MS-CHAPv2 has been disabled on the server.
In the VPN connection properties, click on the Security tab.
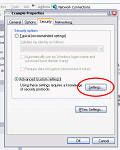
Select the Advanced option, and then click the Settings button.
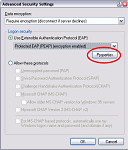
Select the Use Extensible Authentication Protocol (EAP) option.
Select PEAP instead of the default Smart Card option in the drop down box.
Click the Properties button.
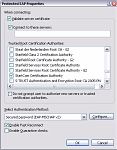
Scroll through the list of Trusted Root Certification Authorities, find the root CA that matches the root of your server certificate, and select it.
Verify the authentication method is set to “Secured password (EAP-MSCHAP v2)”.
If appropriate, click the Configure button to enable automatic login to the VPN with the credentials of the user account at the client computer. Otherwise, the VPN client will prompt the user to log in when connecting to the VPN.
Step 4 – Trusting the Server
The first time each client connects to the new PEAP server, the user will be presented with the server’s authentication certificate and will be asked to verify that the correct server was contacted. After saving this choice, the client will automatically perform this verification at the start of each connection without bothering the user. Note, this feature does not exist in MS-CHAPv2. It is an additional security measure that prevents impersonation of the server.
Tips
If you are using the rasdial command or a VPN script such as Windows VPN Keep Alive then keep in mind you must make one manual connection to the PEAP server, as in Step 4 above. The rasdial command will not connect to an untrusted server. An alternative configuration is to use the “Do not prompt user to authorize new servers or trusted certification authorities” option, which I have not yet tested with rasdial. My understanding is that this will force the client to always trust certain certificates, which may be preferable to asking the end user to perform authorization on their own.
Apple’s iPad and similar products are not compatible with PEAP. My recommendation is to not use those products in a security sensitive environment until a solution is available.
The Windows 2003 Connection Manager Administration Kit (CMAK) is not compatible with PEAP. It may be necessary to obtain a newer version of CMAK if you need to create VPN service profiles.
Good, but it will only works, when the client computer is a member of the domain.
When not, you cannot choose the right certificate because the server-certificate is not in the client-list, and cannot export the server-certificate to the client?
Hi volker,
I understand you are asking about the Certification Authority (CA) list and domain certificates. I think there are three possible solutions.
How to Import Root CA Certificate – This should help you to install your domain CA on a client outside of the domain. Also note that the CA certificates are usually published to the same path as the Certificate Revocation Lists, for example C:\WINDOWS\system32\certsrv\CertEnroll
If the certificate you are using is “self-signed” then you could also choose to get a new, signed certificate. Or, you could disable the “Validate server certificate” option in PEAP Properties.
It’s not just iPads that are incompatible with PEAP.
EVERYTHING except for Microsoft devices is virtually incompatible with it. I could not find anything that works on Android, MacOS X, iOS, nor Linux that can access such VPNs.
My current solution (developing mobile applications) is to boot a VM with Windows on it, and configure it to share the VPN connection.
A better solution would be to use L2TP/IPSec, which works everywhere. Save some misery for your users if you read this blog post, and switch to something well supported instead of using PPTP in the only configuration that’s not completely broken.
Thanks Miqrogroove for that very useful post !
As a new CCNA trying to obtain MCITP, I’m very interested by these security subjects on Windows Server 2008R2 and Win7 clients.
I successfully did some VPN labs with EAP-MSCHAPv2 (with or without PEAP). But, believe me ! If you try to do something, a little bit, more sophisticated, you’ll keep long time googling and reading Technet articles before you get a clear understanding of things.
As an exercise for Windows VPN gurus, the exercise I’m trying to make work right now is below :
– VPN solution using certificates based PEAP.
– VPN and NPS servers are joinded to an AD domain and are two separate machines. Authetication uses (of course) RADIUS between VPN and NPS.
– VPN Client is not joined to domain.
– VPN protocol uses certificate on client side (example : L2TP/IPSEC or IKE).
I will appreciate reading any information that could help.
I have tried to secure my SBS2003 PPTP-VPN with the above description. I tried to use my StartSSL Class 2 certificate WWW certificate for the PEAP authentication in the RAS policy – but it doesn’t work:
If I try to connect from a XP system to the VPN, I get an authentication error 919.
If I switch over to MS-CHAP v2 on the client without changing anything on the Server, I get the error that I have no dialin rights – so I think, the RAS policy will work in the case that the EAP authentication is selected, but the authentication fails.
I checked all settings several times with the above description, it’s not very complicated, but it doesn’t work.
Do you have any idea, what’s wrong in my case or what I can do to find the problem?
Thanks.
Hello!
I found the problem now to use SBS2003 and enabling PEAP in my case; changing the RAS policy to allow (only) the EAP authentication is not enough, the EAP protocol must also be selected in the “properties” of the RRAS server itself – on the “security” tab in the “authentication methods” under the “authentication provider” (i tried to translate from german, I don’t know if these control names are correct in US version).
It works fine now, thanks for your how-to!
Hi Matze,
That is an excellent tip. I have updated Step 1 with a note to ensure EAP is not disabled at the server level.
Thank you for writing.